Viser opslag med etiketten wip. Vis alle opslag

torsdag den 11. april 2013

Mirka Fortuna WIP [02]


So another WIP post! Quite a lot of things happned since last time, so I hope to show you what have gone down since last time!


Here I have added most of the plain fabric gold trim and attached the collar. I am not 100% happy about how the collar turned out, but oh well, just gotta deal with it!


And this is why I refer to Mirka as "the Pin Monster". Every time I pin ANYTHING on her, I end up using SO many of my needles :C
- at this point I  have also added some small 'pillows' to the poof part of Mirka's sleeves, just made them from left over lining fabric and some tulle. Gives the poof effect I was looking for!


But while crying over pinning anything, I added more gold fabric to the 'holes', hand sow the sharp edges and added some satin to the front, so I could tie them as bows.
I also added some of the gold trim to the bottom, arm hole and 'boob cutout' area.


Details of the arm hole thing!
- and might I add this whole monster is completely lined on the inside? I am actually rather proud of how it turned out in the end! I am a LITTLE unhappy about having to sow the gold trim on top of the gold fabric, but I recon there was no other way. Boo boo.
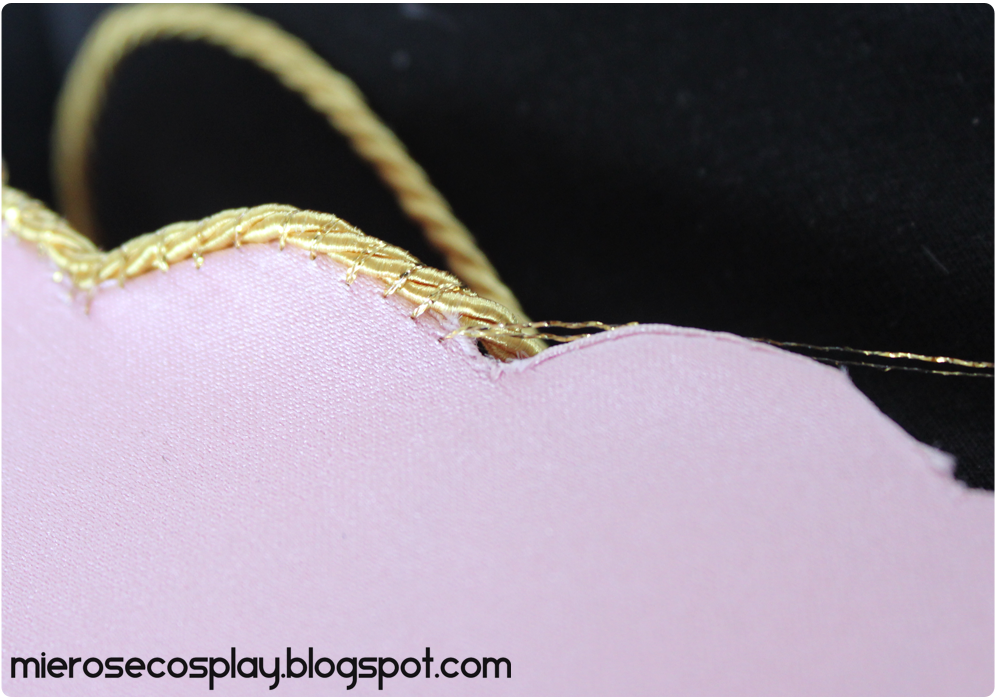


I also added some gold rope to the top of the collar by hand (so much hand work on this costume fuuu) to hide the fact my lining want to get a divorce from the party satin. It is so annoying, but I realized gazing into my references, I am actually on point here, because she do have some detailing on the collar too.


SKIRT TIME!! You might be able to see it a little here, but here is the break down of the skirt:
One chiffon layer. (pink)
One party satin layer. (pink)
Two tulle layers. (white)
One lace layer.
Two tulle layers. (white)
One wedding tulle layer. (off white)
Two tulle layers. (white)
One tulle layer. (white)
Two tulle layers. (white) I THINK MAYBE. I lost count
One chiffon layer. (pink)
- generally, if there is a layer, there is two rows of tulle (one being 10 cm and one 20) for poof. 


All the layers are made out of a full circle skirt, with the hole moved a little off center to get the 'mullet' skirt effect!


How some of the inner parts looks. This is the white tulle layer with two extra rows of tulle for poof, and then the wedding tulle layer (off white pink ish) with some white tulle rows too.


And here is the skirt (with two pettis under because I  just cannot be asked to take them off, but it looks like this on too. Thank you hips and butt). I absolutely HATE the zipper. It's poo. But I will have a big flap thingy hanging over it, so it is okay... but I am still embarrassed about how awful I sew it on :C
 

And here I have pretty much finished her sleeves by adding the two bows! I just need to add a red stone and some gold rope under the bottom ribbon, but I already know how I want to go about doing this, fufufu.
You can also see I have added zippers to the front, because I just do not trust satin ribbons to keep my boobs private haha.

Next up is the hat and the ass flap thingy! Hopefully I will finish the ass thing during next week, wish me luck!

Thank you for stopping by~


søndag den 10. marts 2013

Mirka Fortuna WIP [01]


Finally I get to start this beauty! So now you can get to follow my slow progress on Mirka Fortuna from Trinity Blood!


Basic pattern making! Used the cheapest linen fabric I had lying around for it, and pinned it around my dress form, and got cracking with a marker, and then a scissor.


Friday two weeks ago I had a cosplay session with my one of my partners for this Trinity Blood project, Kami, where we first went out and found fabric, and then spend a whole weekend just sowing. (and so far I've spend around 190$ on her on just fabric. Darrrrn)


Decided to add some things you iron on, and that stiffens up the fabric, so make sure the cut outs could hold their shape!

And this is the sleeve after a weekends worth of work. I have now also finished the other sleeve, but it has been too dark to get a proper picture, so you will have to wait for that!

søndag den 26. august 2012

Serah Farron [WIP]


So this post will NOT be a in depth tutorial about how I made my whole costume, but more a collection of photos of some parts of the progress (simply because I sometimes forget to document everything), but if you do have a question about anything, please just contact me! I am not one of those cosplayers that treats my costumes and their construction like company secrets XD


I split the dress up in three parts: the white under dress, the pink/rosa front and back parts and the side parts. The white under dress is spandex on the top, and just basic white cotton at the stomach and bottom, because that is not really showing anyways.
The pink/rosa parts are made from cotton also with a brown pleather trim. One part of the sides are sown with buttons so I can open them while taking the dress on (bottom right picture). For the gold buttons on the front and back I just got some I found fitting and hot glued them on (not the best solution but I manage anyways)


Basically a lot and even more layers of fabric cut in the shape I wanted. And all the small gold squares are hand glued on. Boo :C


The base of Serah's front shield is made out of fun foam and so it the rest of the details too. It was basically just a matter of having a steady hand and cutting in an angle so the raised details would blend in better.


After A LOT of coats of thinned glue I spray painted it all gold, and my best bro Louise painted the base brown for me because I am too inpatient to do stuff like that.
- the grey thing under the shield is made almost the same way, but I used some thin styrine as a base instead of fun foam

I hate and love making gloves... Fuu.
And the details are made out of fun foam coated in glue (and black paint job is done by Louise again, I hate painting stuff)


The leg things. Made in Lycra spandex, stretch gold fabric, white spandex and brown pleather. The gold parts around the knee is just pinned on and then sown onto the base. And I did not choose to do it on the back of the leggings, I think it is too much tbh. Artistic freedom! And the top square part is a mixture of fabric paint and a black copic marker. The marker worked the best on the gold fabric it turned out 8D;


Armbands. Styrine base, fun foam raised details, glue, spray paint, le done.


I really liked doing the bag, but it was at the same time the most tricky part of the costume, because it had to be dead on precise. But in the end it turned out pretty good. The belt part is fun foam with gold fabric sown onto it, and it had a Velcro closing inside of my bag. The bag itself is made out of white pleather, and has a turquoise satin lining. In between those two layers there is some thick almost paper like fabric to stiffen it a little. The bottom squared patterned fabric is just basic cotton that I painted with black fabric paint. Details in fun form and paper clay.  


My first tryout before Desucon. Since then I made the bag and remade the shoes. 

- from DesuCon, before new shoes and bag. 


And here is how it looked at Genki with my lovely Maqui and sexy as f*** Noel.


 is my ship that visible?


 Thank you so much for looking through this long entry! Next time you see Serah hopefully it will be as a proper photo shoot <3